Continuing the Hugo Journey
As discussed in the previous Blog post, I’ve started to host my own tech blog site using the Hugo platform and hosting through GitHub pages. Today I decided to play with the platform a little more and see if I could extend my site to multiple pages and make it more of a personal homepage along with the blog. With this goal in mind, I worked on the following items:
- Add two additional pages: Portfolio and Blog
- Customize the Ananke theme to meet my personal taste
Adding additional pages
Within Hugo, the process to add more pages is quite simple. You just need to perform the following steps:
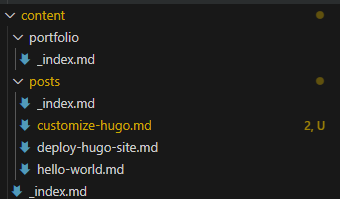
- Create subfolders under content for each page you want.
- Create an _index.md file in each folder.
- Update the hugo.toml file with navigation links for each of the new pages:
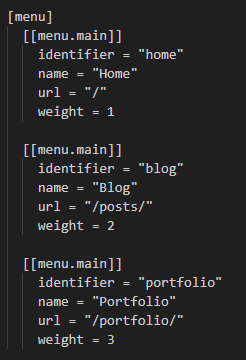
Once these steps are performed, it will show the links on the homepage header like this:

Adding content to the sub-pages
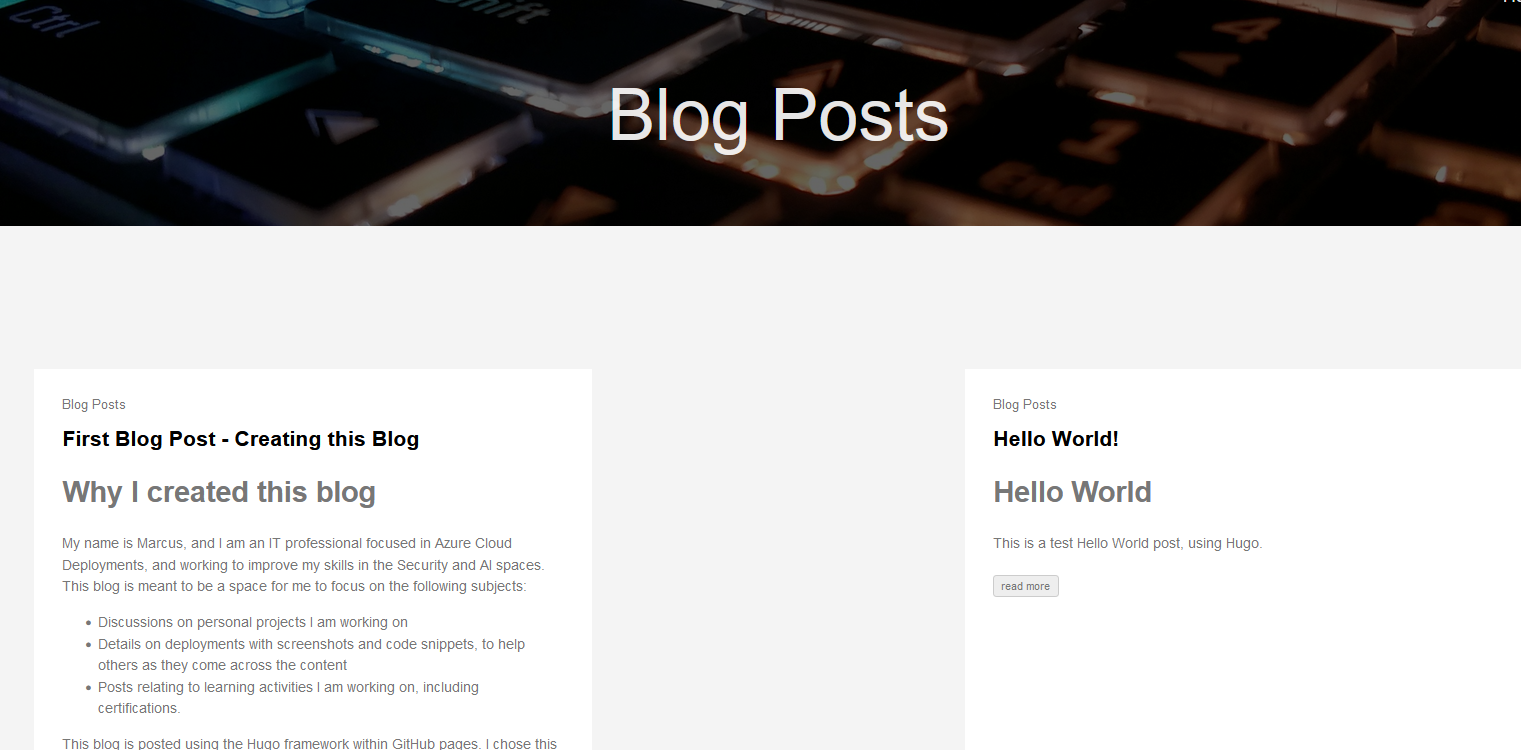
For the Blog page, I simply updated the posts/_index.md file with the following metadata (more on the featured_image and header_height values later in this post):
Note: This page is just intended to show all of the blog posts so readers can see the full history instead of just the most recent posts. Therefore, no additional content is needed for this page.
---
title: "Blog Posts"
featured_image: '/images/keyboard.jpg'
header_height: '300px'
---
Once published it looks like this:
For the Portfolio Page, this is intended to be a place for me to write a little more about myself. I used a similar header to the Blog page (with a different image) but then added markdown text to build out my portfolio. At the time of this writing, I still need to populate this content, but in the meantime I just pasted in a markdown template that I generated using GitHub Copilot.
---
title: "Portfolio"
featured_image: '/images/coffee2.jpg'
layout: 'list'
header_height: '300px'
---

This page is under construction

# About Me


My name is not [Your Name], and I am a [Your Profession]. I specialize in [Your Specialization] and have experience in [Your Experience].

# Skills
- Skill 1
- Skill 2
- Skill 3

# Experience
## [Job Title] at [Company Name]
**[Start Date] - [End Date]**
- Responsibility 1
- Responsibility 2
- Responsibility 3

...content continues...
The current view of this page looks like this, though note that this page will be updated in the coming days:

Customizing the Ananke theme
While the default Ananke theme is easy to deploy to test a new site, it is admittedly pretty boring, so let’s customize it.
In the previous blog post, I discussed using the git submodule add https://github.com/theNewDynamic/gohugo-theme-ananke.git themes/ananke command, which loads it directly from the publisher’s GitHub. This is great for testing. We can test edits locally on your PC to see how they look, but if you want to publish the edits to your hosted page the commit will fail since you don’t have write access to the owner’s GitHub.
Fork the repo to your GitHub
To solve this, you will need to fork the owner’s repo to your own GitHub. For more details on how to do this, see GitHub Docs - Fork a repository. Once you have the repo forked into your own GitHub, you can use the same command but add reference your own GitHub repository for the submodule, similar to: git submodule add https://github.com/YOURGITHUB/gohugo-theme-ananke.git themes/ananke (replace YOURGITHUB with your site name).
Note you may need to de-commit the old submodule from your hugo build and delete ananke from your themes before adding it back.
Edit the look and feel
Now that you are working completely within your own GitHub, you will be able to check in as many changes as you want for your published site. These are the items that I wanted to update:
- The header block size
- The images in my headers
Updating the header block size
The Ananke theme has a lot of interdependencies, and it took me a bit of time playing with it to figure it all out. For a quick summary:
- Your hugo.toml file is used to define the core attributes for your site all-up, and allows some customization for the homepag.
- Your layouts are defined in the themes > ananke > layouts folder within your repo.
- The _default subfolder contains the core files for your different layouts. The main ones I worked with are:
- baseof.html (home page defalt)
- single.html (for the single layout)
- list.html (for the list layout)
- Each of the html files above contains a block looking similar to:
{{ block "header" . }}
    {{ partial "site-header.html" .}}
{{ end }}
- These blocks refer to a partial file that configures the headers. There are two different ones that may be referenced:
- partials > site-header
- partials > page-header
- For the sake of simplicity, I pointed all 3 of my layout files to site-header.html
- There are many different ways to customize this, but the format I liked looks like:
 <header class="{{ $featured_image_class }}" style="background-image: url('{{ $featured_image }}'); height: {{ .Params.header_height }}; background-position: center;">
    {{ $cover_dimming_class := site.Params.cover_dimming_class | default "bg-black-60" }}
    <div class="{{ $cover_dimming_class }}" style="height: 100%;">
      <div style="position: absolute; top: 0; right: 0; left: 0;">
        {{ partial "site-navigation.html" .}}
      </div>
      <div class="tc-l ph3 ph4-ns" style="display: flex; flex-direction: column; justify-content: center; height: 100%;">
        <h1 class="f2 f-subheadline-l fw2 white-90 mb0 lh-title">
          {{ .Site.Params.header_title | default .Title }}
        </h1>
        {{ with .Params.description }}
          <h2 class="fw1 f5 f3-l white-80 measure-wide-l center mt3">
            {{ . }}
          </h2>
        {{ end }}
      </div>
    </div>
  </header>
- From here, I returned to each of my _index.md files and set the header_height to the size I liked. In my case, I went with
header_height: '300px'
Choosing a layout for my Portfolio page
I compared the way the list and single layouts looked, and liked list better for this page: layout: 'list'.
Note I chose not to add a custom layout for my Blog page at this time, but may look at customizing this more in the future.
The images in my headers
Adding header images was pretty straightforward.
- First, from the root of your directory create a the folders static > images
- Search the internet for some public domain images you like (please do not use copyrighted images), and save them into the folder. You may decide you want to tweak them with a photo editor to make them work well with your page.
- In each of your _index.md files, add a line that looks something like:
featured_image: '/images/keyboard.jpg'
From here, just rebuild your page and see the changes! Once you are happy with them, commit them up to GitHub and your existing GitHub action should publish them up to your site.
Learnings
I spent several hours fussing around with the Ananke theme, and asking GitHub Copilot for suggestions along the way. Honestly, the two things that took me the longest to sort out were:
- I didn’t realize that I needed to fork the Ananke repo for embarrassingly long time. I was seeing changes running the Hugo server locally, but could not for the life of me post them to my site.
- Figuring out all of the interdependencies within the Ananke theme, in order to adjust the headers.
A note on GitHub Copilot Since I am still a novice at coding, I was relying pretty heavily on GitHub Copilot within VS code to help me find solutions, especially when it came to adjusting the themes. While it was useful in getting me where I needed, it is important to know that, as with any Ai, it will have [hallucinations](https://en.wikipedia.org/wiki/Hallucination_(artificial_intelligence). Therefore, be careful not to just copy and paste the provided solutions blindly. When using Ai, it is always good to use the principle of trust,but verify. Also if you have something that is generally working, it is a good idea to keep backup versions you can get back to easily so you don’t end up breaking your code and not being able to fix it. /rant.